Payment gateway setup instructions
• Barclaycard ePDQ
• Barclaycard API
• WorldPay
• ConCardis
• Opayo (formerly SagePay) Hosted
• Realex/Global Payments
• Trust Payments
• Klarna
• 2Checkout
• Adyen
• Amazon Pay
• Connect-E/Dojo
Certain payment gateways on our platform have special requirements for setup within the payment gateway account. Setup instructions for these gateways are contained below.
Barclaycard ePDQ
If you have an SSL certificate please do not use the https protocol for your transaction feedback URL. Instead this should always be entered as http://www.domain.com/checkout/process/callback/10 (substituting domain.com for your actual domain name).
1. Login to your Barclaycard EPDQ account and select 'configuration' and then 'technical information' from the menu.
2. Click on the 'payment page' tab and in the field 'URL of the webpage to display to the customer when he clicks the "back" button on our secure payment page' enter the URL displayed below.
https://www.domain.com/checkout/address
3. Click on the 'data and origin' tab and in the field 'URL of the merchant page containing the payment form that will call the page: orderstandard.asp' enter the URL displayed below.
https://www.domain.com
4. Below that field you should enter a password (of your choice) into the SHA-IN pass phrase field. You should enter the same password into the payment gateway settings of your account on our platform.
5. Click on the 'transaction feedback' tab and tick the 'I would like to receive transaction feedback parameters on the redirect URLs' box.
6. Below that field, under the heading 'Direct HTTP server-to-server request' select the 'Always online' tick box.
7. In the field labelled 'if the payment's status is "accepted", "on hold" or "uncertain" enter the URL displayed below.
http://www.domain.com/checkout/process/callback/10
8. For the 'Request method' select POST.
9. Tick the field labelled 'I would like Barclaycard to display a "processing" message to the customer during payment processing'.
10. Below that field enter a password into the SHA-OUT pass phrase field. You should enter the same password into the payment gateway settings of your account on our platform.
Barclaycard API
No additional setup is required, however please ensure that the Hash Algorithm setting is set to SHA-256.
The setting is located at Configuration > Technical information > Global security parameters.
WorldPay
If you have an SSL certificate please do not use the https protocol for your payment response URL. Instead this should always be entered as http://www.domain.com/checkout/process/callback/3 (substituting domain.com for your actual domain name).
1. Login to your WorldPay account and go to the installations page. Select either 'Production' or 'Test' depending on which environment you want to configure.
2. In the field labelled 'Payment Response URL' enter the URL displayed below:
http://www.domain.com/checkout/process/callback/3
Replace domain.com with your actual domain name.
3. Tick the box labelled 'Payment Response Enabled?'
4. Tick the box labelled 'Enable the Shopper Response'.
5. In a new tab open your ShopWired account. Select from the menu, and select to configure WorldPay from the list of payment gateways.
6. Select either 'Production' or 'Test' based on which option you selected in WorldPay.
7. Enter your unique installation ID which is provided to you in your WorldPay account.
For additional security (optional)
8. Create a secret password and enter it in the 'Secret (optional)' field for WorldPay on the payment gateway configuration page in your ShopWired account.
9. Enter the secret into the field 'MD5 secret for transactions' in your WorldPay account. The secret you enter in WorldPay must match the secret you entered into ShopWired.
10. Into the 'SignatureFields' field enter instId:amount:currency:MC_order_id
Merchant Code (optional)
11. If WorldPay have supplied you with multiple merchant codes, enter the one you want to use for this installation in the 'Merchant Code (optional)' field for WorldPay on the payment gateway configuration page in your ShopWired account. Make sure you enter the merchant code correctly.
ConCardis
1. Login to your ConCardis account and select 'configuration' and then 'technical information' from the menu.
2. Click on the 'payment page' tab and in the field 'URL of the webpage to display to the customer when he clicks the "back" button on our secure payment page' enter the URL displayed below.
http://www.domain.com/checkout/address
3. Click on the 'data and origin' tab and in the field 'URL of the merchant page containing the payment form that will call the page: orderstandard.asp' enter the URL displayed below.
http://www.domain.com/checkout/address
4. Below that field you should enter a password (of your choice) into the SHA-IN pass phrase field. You should enter the same password into the payment gateway settings of your account on our platform.
5. Click on the 'transaction feedback' tab and tick the 'I would like to receive transaction feedback parameters on the redirect URLs' box.
6. Below that field, under the heading 'Direct HTTP server-to-server request' select the 'Always online' tick box.
7. In the field labelled 'if the payment's status is "accepted", "on hold" or "uncertain" enter the URL displayed below.
http://www.domain.com/checkout/process/callback/10
8. For the 'Request method' select POST.
9. Tick the field labelled 'I would like ConCardis to display a "processing" message to the customer during payment processing'.
10. Below that field enter a password into the SHA-OUT pass phrase field. You should enter the same password into the payment gateway settings of your account on our platform.
Opayo (formerly SagePay) Hosted
To use this payment gateway you will need to add our IP addresses within your Opayo account. Please contact Opayo support for assistance with this. The IP address you should add is 54.247.109.89.
Realex/Global Payments
To allow customers to pay with American Express when using this gateway, you will need to select 'Yes' under the 'Allow customers to pay with American Express' setting when configuring the gateway.
Additionally you will need to whitelist our IP address within your Realex/Global Payments account. The IP address is 46.137.84.144. Please contact Realex/Global Payments support for assistance with this.
Trust Payments
In order for the message from Trust Payments, saying that an order has been paid, to reach the ShopWired servers, you must ensure that the enable site security setting is enabled within your Trust Payments account.
Trust Payments may also ask what fields are being hashed by ShopWired in the payment request message. For reference, these are:
errorcode
orderreference
paymenttypedescription
requestreference
settlestatus
sitereference
transactionreference
Klarna
It is not currently possible for international customers to your website to pay you using Klarna. This means if your website is based in the UK, only customers based in the UK will be able to pay using Klarna, or if you are based in the US, only customers based in the US will be able to pay using Klarna.
To use this payment gateway please follow the instructions below:
1. Login to your Klarna account. If you don't yet have a Klarna account you can create one here. During the account creation process, when Klarna asks you to choose your platform select Other integration solutions. Then, from the drop-down, select Own built integration.
2. Once you have successfully created and logged in to your account, you will need to obtain your API username and password. You can read Klarna's help guide on how to do this here.
3. Within your ShopWired account you can activate either Klarna Checkout or Klarna Payments. These options enable different functionality for your customers. Klarna Checkout allows your customers to checkout their order using their details saved in their Klarna account (so they click a 'pay with Klarna' button on your website's shopping basket page). Klarna Payments is a traditional payment gateway where users are offered to finalise their payment with Klarna. Please make sure you only activate the options that are available to you (you may need to check with Klarna what options you have access to).
4. Enter the URL of the terms and conditions page on your website. This is usually https://www.yourdomain.com/terms-conditions (replacing yourdomain.com with your actual website domain). Please check the URL is correct by visiting it in your browser.
5. If you are offering Klarna in a language other than English, then the language field should be set with the country code for the language you want to use, e.g. ES for Spanish. If your website is in English, you should leave this field blank.
To refund customers for a purchase they made with Klarna, you should navigate to your Klarna merchant portal and refund them through there. For more details on this, please check Klarna's help guides.
2Checkout
To use this payment gateway please follow the instructions below:
1. Enter your Merchant Code and Secret Key provided by 2Checkout into your ShopWired account. You can get these details from 2Checkout after logging into your 2Checkout account and selecting 'integrations' from the left menu.
2. From the 'integrations' page in 2Checkout, select the 'IPN settings' tab.
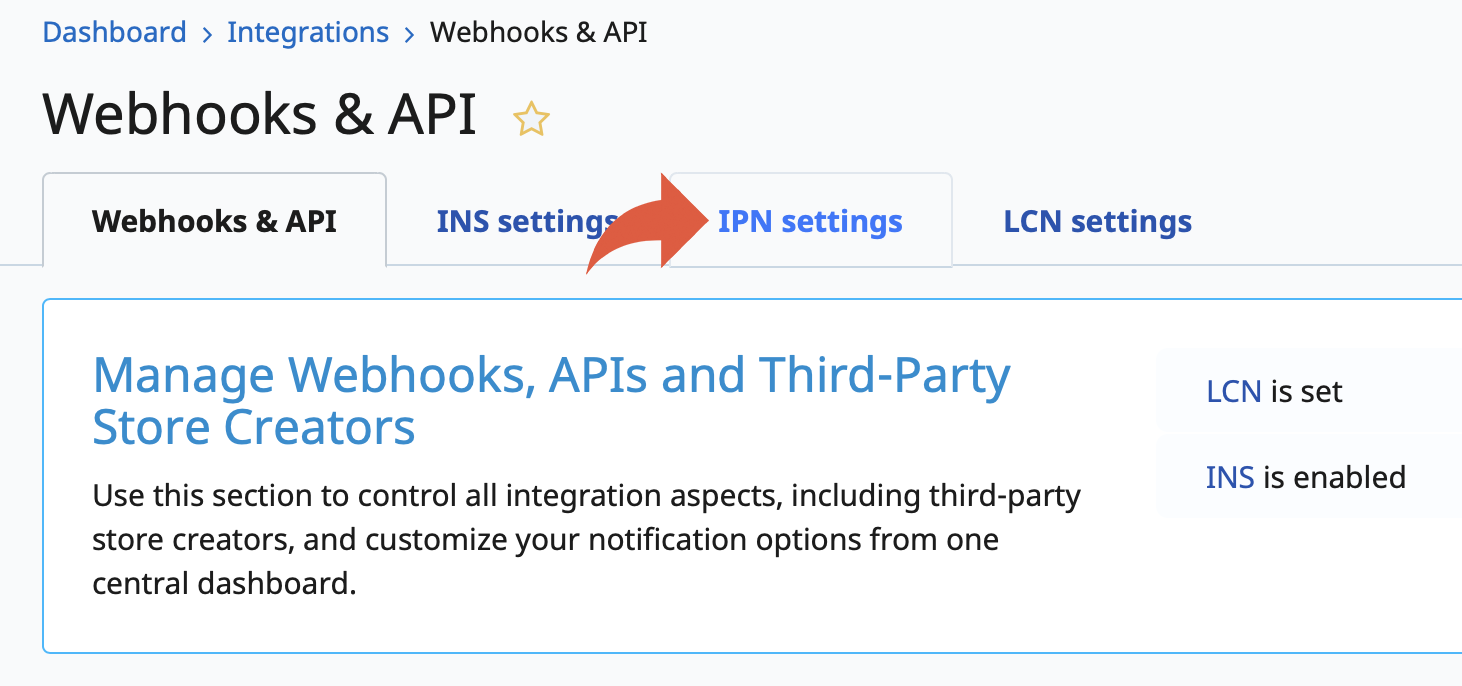
3. Click the 'add IPN url' button and in the popup window enter the URL of your IPN.
4. Your IPN URL is formed from your domain name in the format
https://www.domain.com/checkout/process/callback/61
Replacing domain.com with your website's actual domain name.
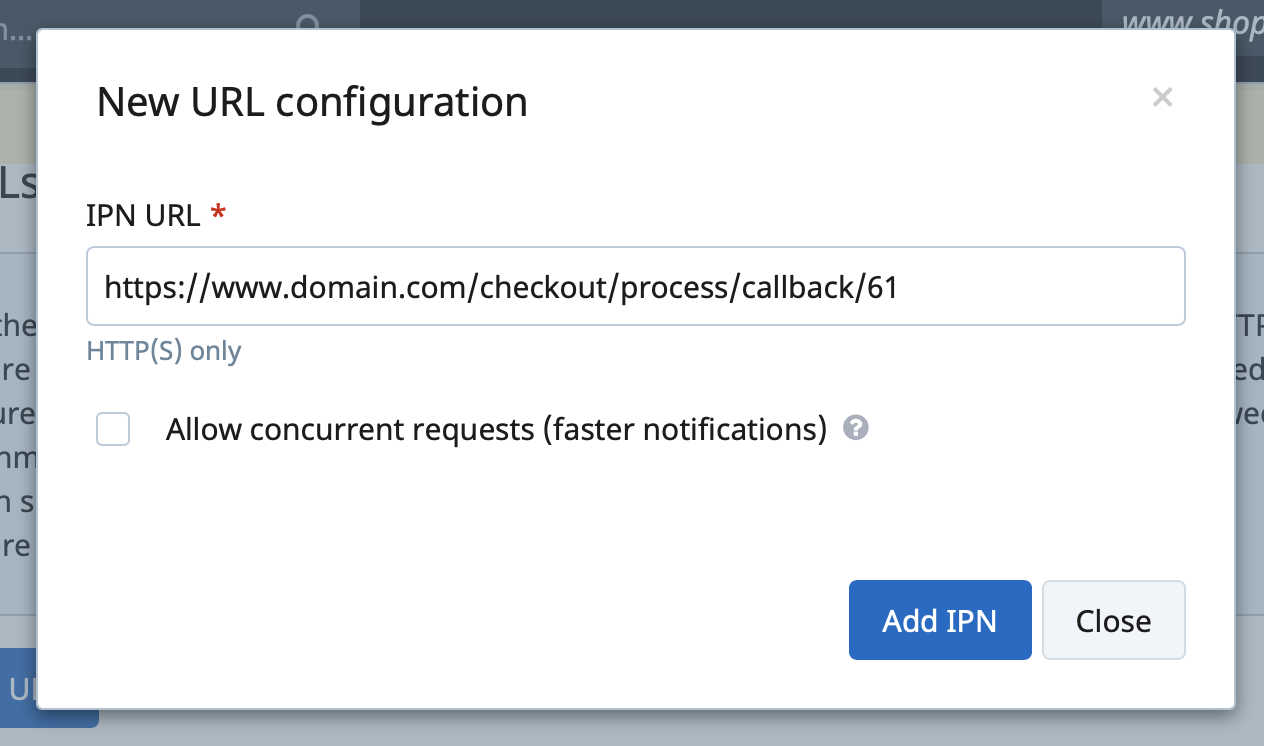
Click the 'add IPN' button. 2Checkout will then test the IPN.
If you have any difficulties in adding the IPN please contact us.
Setup will now be complete and you can create a test purchase through your website. When placing a test purchase please ensure it is for at least $1.00.
Adyen
To use this payment gateway please follow the instructions below:
1. Select 'settings' from the left menu of your Adyen account and then 'merchant account'.
2. The Account Code (as shown in the screenshot below) is the Merchant Account that you need to enter into ShopWired.
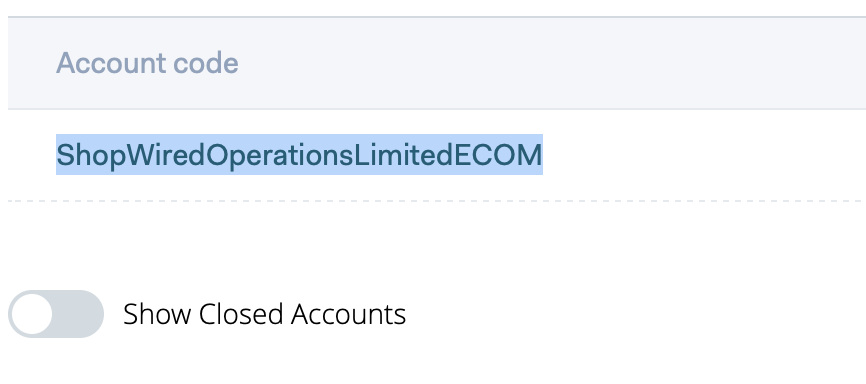
3. Select 'developers' from the left menu of your Adyen account and then 'api credentials'.
4. You'll need to locate an API user with the username ws, if one exists click on it. If one doesn't exist click 'create new credential' (create a web service user).
5. In the authentication section select API KEY and then click to generate a new key. Once the key has generated copy and paste this into the API Key field in ShopWired.
6. Scroll down the page and locate the Client key and copy and paste this into ShopWired.
7. Click to save your changes in Adyen.
8. Select 'developers' from the left menu of your Adyen account and then 'webhooks'.
9. Click the 'webhook' button in the top right to create a new webhook.
10. Click 'add' for the standard notification section.
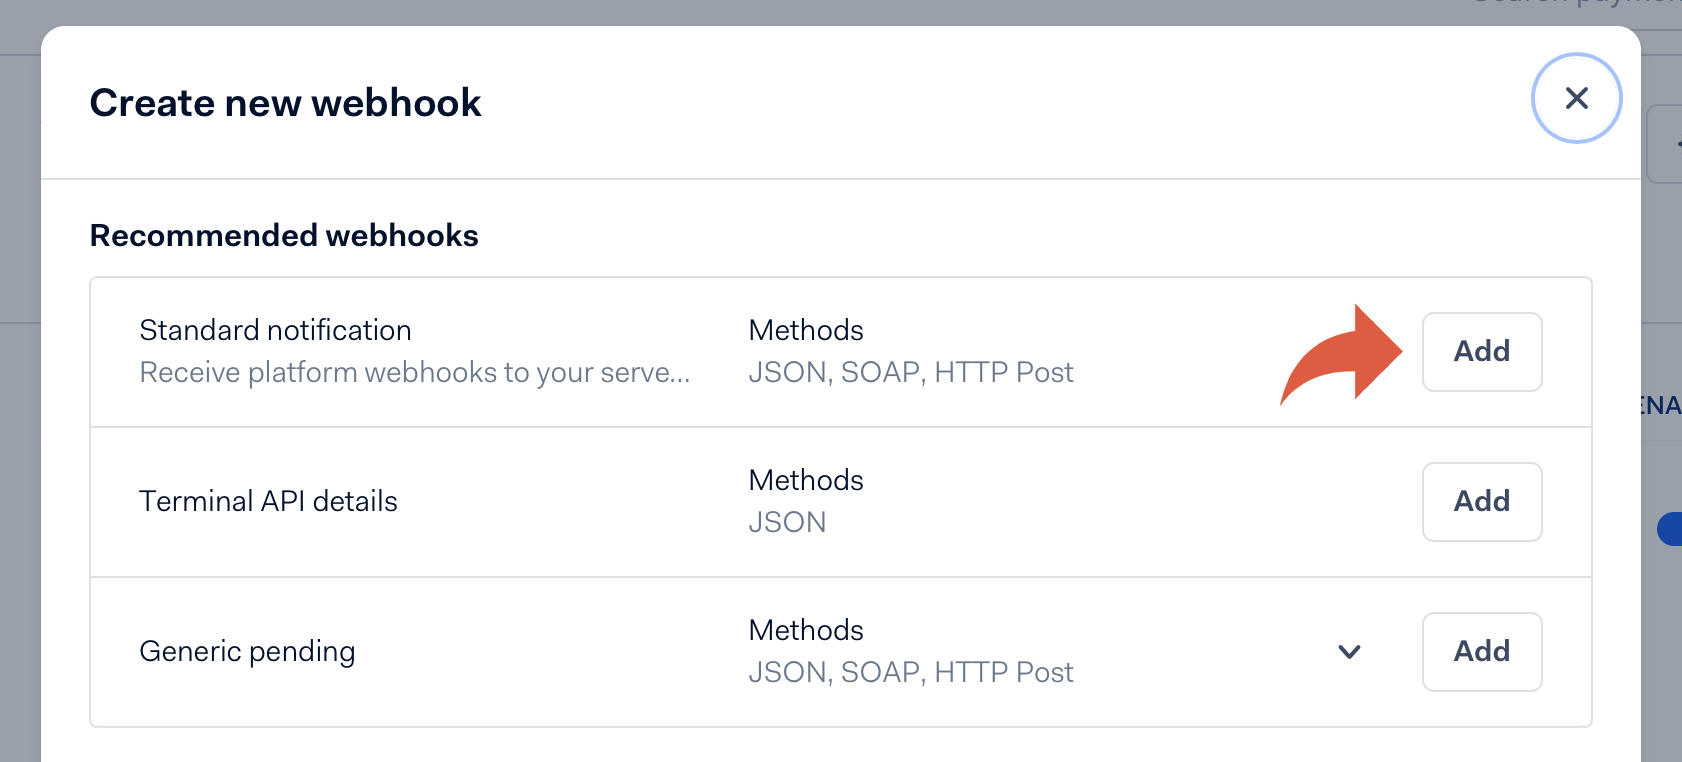
11. Enter the URL as https://www.domain.com/checkout/process/callback/62 replacing domain.com with your actual domain name.
12. Select the method as JSON.
13. Enter the username as shopwireduser and create a password. Enter this username and password into ShopWired.
14. Open the 'additional settings' section and click to generate a new HMAC key.
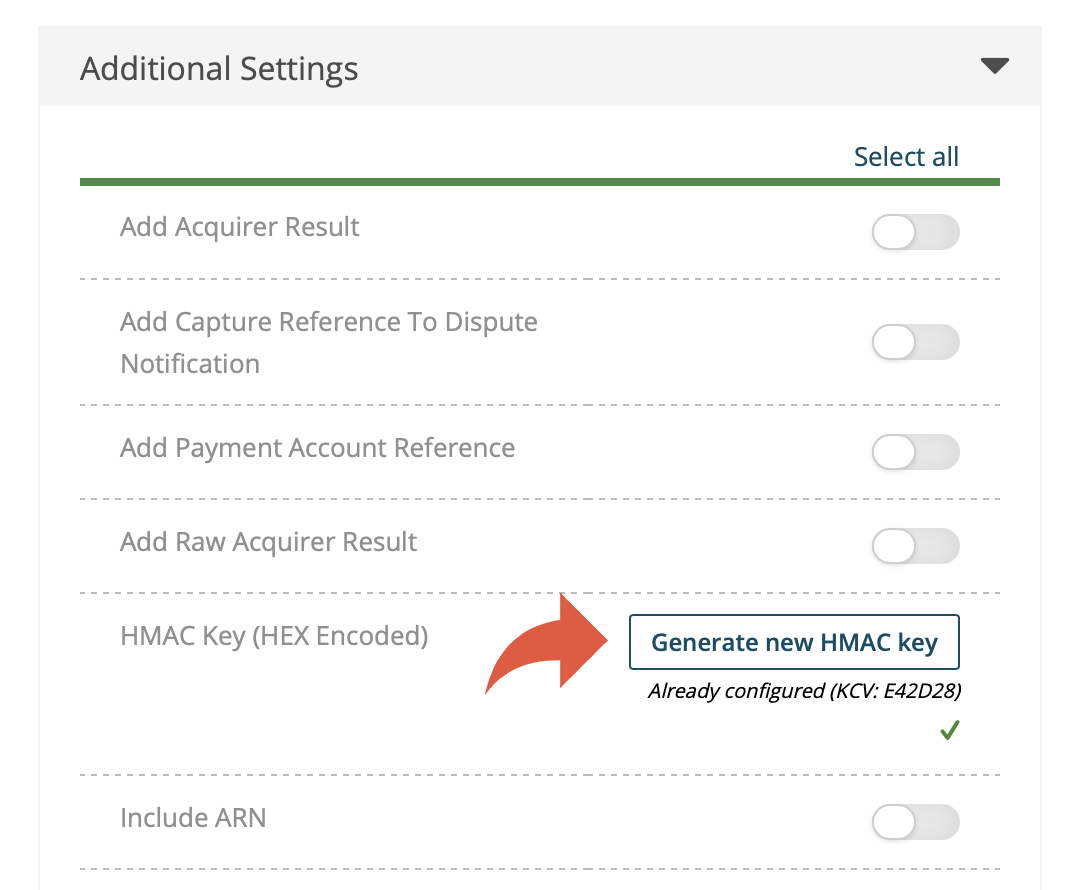
15. Enter this HMAC key into ShopWired.
16. Click to save your changes in Adyen.
Amazon Pay
You'll need to set up your Amazon account with a new application and ensure that:
• The allowed javascript origin is set as your website address (including the https:// protocol), e.g. https://www.example.com
• The allower return URL set as https://www.yourdomainname.com/amazon/login (replacing yourdomainname.com with your website's actual domain name).
Connect-E/Dojo
To use Dojo with your ShopWired website, you will need to connect this through the Connect-E option in the payment gateways list.
To configure Connect-E, please use the instructions below:
- 1. Login to the Dojo developer portal here.
- 2. Click Dojo App from the left hand side and log in when prompted to.
- 3. Once logged into Dojo App, go to Accounts > Locations
- 4. Select the location linked to your website. A location details tab will then appear.
- 4. In the Location details tab that appears, go to REMOTE PAYMENTS > Developer resources. Here you can find the JWT token and gateway username.
- 5. Copy the JWT token and paste this into the API key field in the payment gateway page inside your ShopWired account.
- 6. Copy the gateway username and paste this into the Merchant URL field in the payment gateway page inside your ShopWired account.
