Displaying a set of gallery images on a page
If you would like to display the images from a gallery on a website page then you can follow the instructions below.
Please note that this guidance does not include instructions about how to style your gallery images so that they appear and display nicely. The styling of your images will be down to the CSS/JS code that you use on the page.
Creating a gallery
You'll first need to create a gallery where you can upload your images to.
You can read more about creating a gallery and uploading images by following the instructions in this article.
Creating a gallery setting
Once you've created a gallery, you'll need to create a 'setting' for the gallery within the settings.json file of your theme.
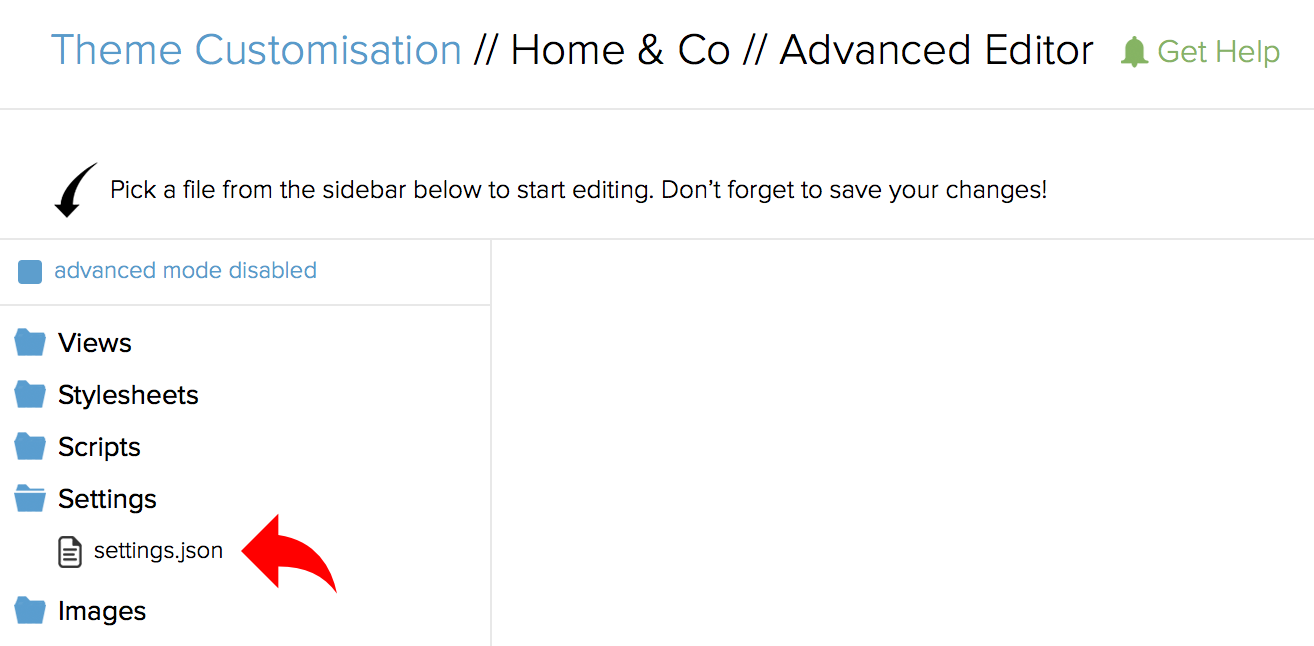
Go to the page editor and locate the 'settings' folder from the left hand side and click to open the settings.json file

You can read more about the settings.json file in this article.
You need to find the existing section within that file where your theme's current image galleries are defined. The exact position and wording of this section will vary from theme to theme, but it will look something like the example below.

Another gallery setting needs to be added to this section, you can use the example code shown below.
{
    "label": "Sample Gallery",
    "name": "gallery_sample",
    "type": "gallery"
}
You should change the label and name according to your requirements. You'll now end up with something that looks like the example below.
{
    "title": "Galleries",
    "description": "Choose the galleries to use from your account on your theme.",
    "advanced": true,
    "settings": [
        {
            "label": "Home Images",
            "name": "gallery_home_photos",
            "type": "gallery",
            "images": [
                "images/samples/home-image-1.jpg"
            ]
        },
        {
            "label": "Sample Gallery",
            "name": "gallery_sample",
            "type": "gallery"
        }
    ]
},
It's important to take care that the new code that you add in keeps the settings.json file as valid JSON. You can use a JSON validator to make sure.
Once you've finished, save your changes.
Setting the gallery
Now you've created the gallery and the corresponding theme setting, you'll need to associate the two together.
In order to do so, visit the 'theme settings' page of your theme and scroll to the galleries section.
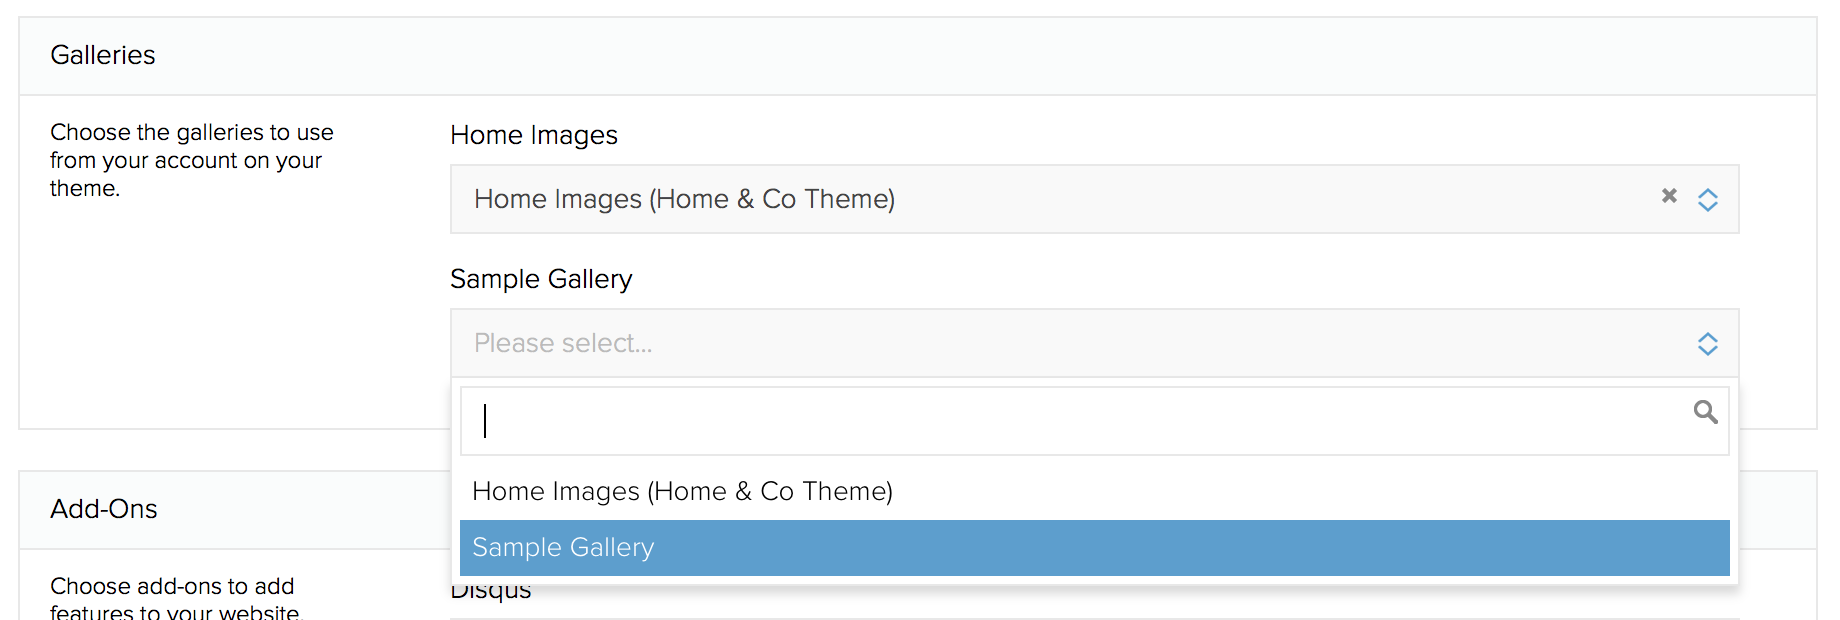
Find the drop down for the new setting that you create (which will be labelled with the label that you entered) and select the gallery you created from the drop down list. As shown on the example below.

When you've finished, save your changes.
Referencing the gallery in your page
You'll now need to go back to the page editor and select the page file that corresponds to the website page that you want to use the gallery on.
The exact name of the file will depend on the theme that you are using.
Whatever page you are placing the gallery onto, you are more than likely to have to use some Twig logic in order to ensure the gallery only appears on the page you want it to.
For example, let's say that you want the gallery to appear on the about us page of your website. The code to display the gallery image would need to be added to the twig file that renders this page, e.g. page.twig but surround the code to display the gallery with Twig code to ensure that it only displays on the about us page.
The code to display the gallery is shown below, you'll need to replace the gallery_sample text with whatever name you gave the gallery in the settings.json file.
{% set images = global.theme.settings.gallery_sample %}
{% if images %}
    {% for image in images %}
        <div class="slide">
            <img src="{{ image.url }}" alt="{{ image.name }}">
        </div>
    {% endfor %}
{% endif %}
The code above is then inserted into the page.twig file, as shown on the example below.
{% extends 'templates/content_page.twig' %}
{% set title = page.title %}
{% block content %}
    <div class="col-sm-7 col-md-8 col-lg-9 page-content">
        <h2 class="no-margin-t lg-headline">{{ page.title }}</h2>
        {% if page.title == 'About Us' %}
        {% set images = global.theme.settings.gallery_sample %}
            {% if images %}
                {% for image in images %}
                    <div class="slide">
                        <img src="{{ image.url }}" alt="{{ image.name }}">
                   </div>
                 % endfor %}
            {% endif %}
        {% endif %}
        {{ page.content|raw }}
    </div>
{% endblock %}
You'll notice that the new code is surrounded in an if statement so that the images are only outputted on a page where the title is About Us.
