Kashflow
If you use the Kashflow online accounting platform to manage your business you can connect your Kashflow account to your ShopWired account so that orders placed on your website will be automatically 'sent' to Kashflow as invoices.
To connect your Kashflow and ShopWired accounts you will first need to install the app. To do this select from the menu. Find and select the ‘Kashflow’ app and select INSTALL THIS APP. Once you’ve installed the app follow the guidance below to configure your settings:
• Enabling API access
• Kashflow app settings
• Payment settings
• Exporting orders
• Export errors
The ShopWired support team are unable to provide help or support with regards to your use of Kashflow. We can only support you on the functions that our app provides.
Enabling API access
Firstly, you'll need to enable API access within your Kashflow account. From within Kashflow, select from the left menu and then click API Settings in the top right hand corner.
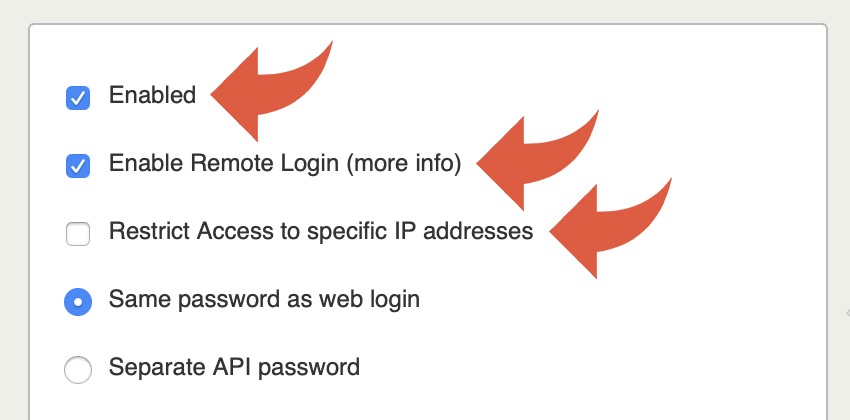
As shown in the following example, you should ensure that Enabled is ticked, Enable Remove Login (more info) is ticked and Restrict Access to specific IP addresses is not ticked:

Save your changes once done.
Kashflow app settings
You’ll then need to configure the Kashflow app settings within your ShopWired account. To do this select from the menu and use the ‘Kashflow Settings’ section.
Use the following guidance to help configure your settings:
Kashflow login details
First, enter your Kashflow account username and password.
Projects
Kashflow has a system of projects which you can read more about in Kashflow's help guides. If you haven't already done so, you'll need to create a project within your Kashflow account which orders received through your ShopWired account can be assigned to. You can read how to create a project within Kashflow here.
Once you've created at least one project on your Kashflow account, you'll be able to select it from the project drop down list within the app on ShopWired. You can click Refresh List to get the latest set of projects from your Kashflow account.
Currency code and exchange rate
Finally, you'll need to enter a Currency Code and Exchange Rate. If your Kashflow account and ShopWired account are both transacting in UK £ then you can enter GBP for the currency code and 1.0 for the exchange rate.
Your settings section should then look similar to this:

Payment settings
When payment is made for an order on your website the app can automatically create the payment in a Kashflow bank account.
You can activate payment export by ticking the 'export payments' tick box at the top of the 'Payment Account Settings' section.
The payment will also be assigned to a Kashflow payment method.
If you receive an order that is placed using the offline payment method then a payment will not be created with the invoice in Kashflow.
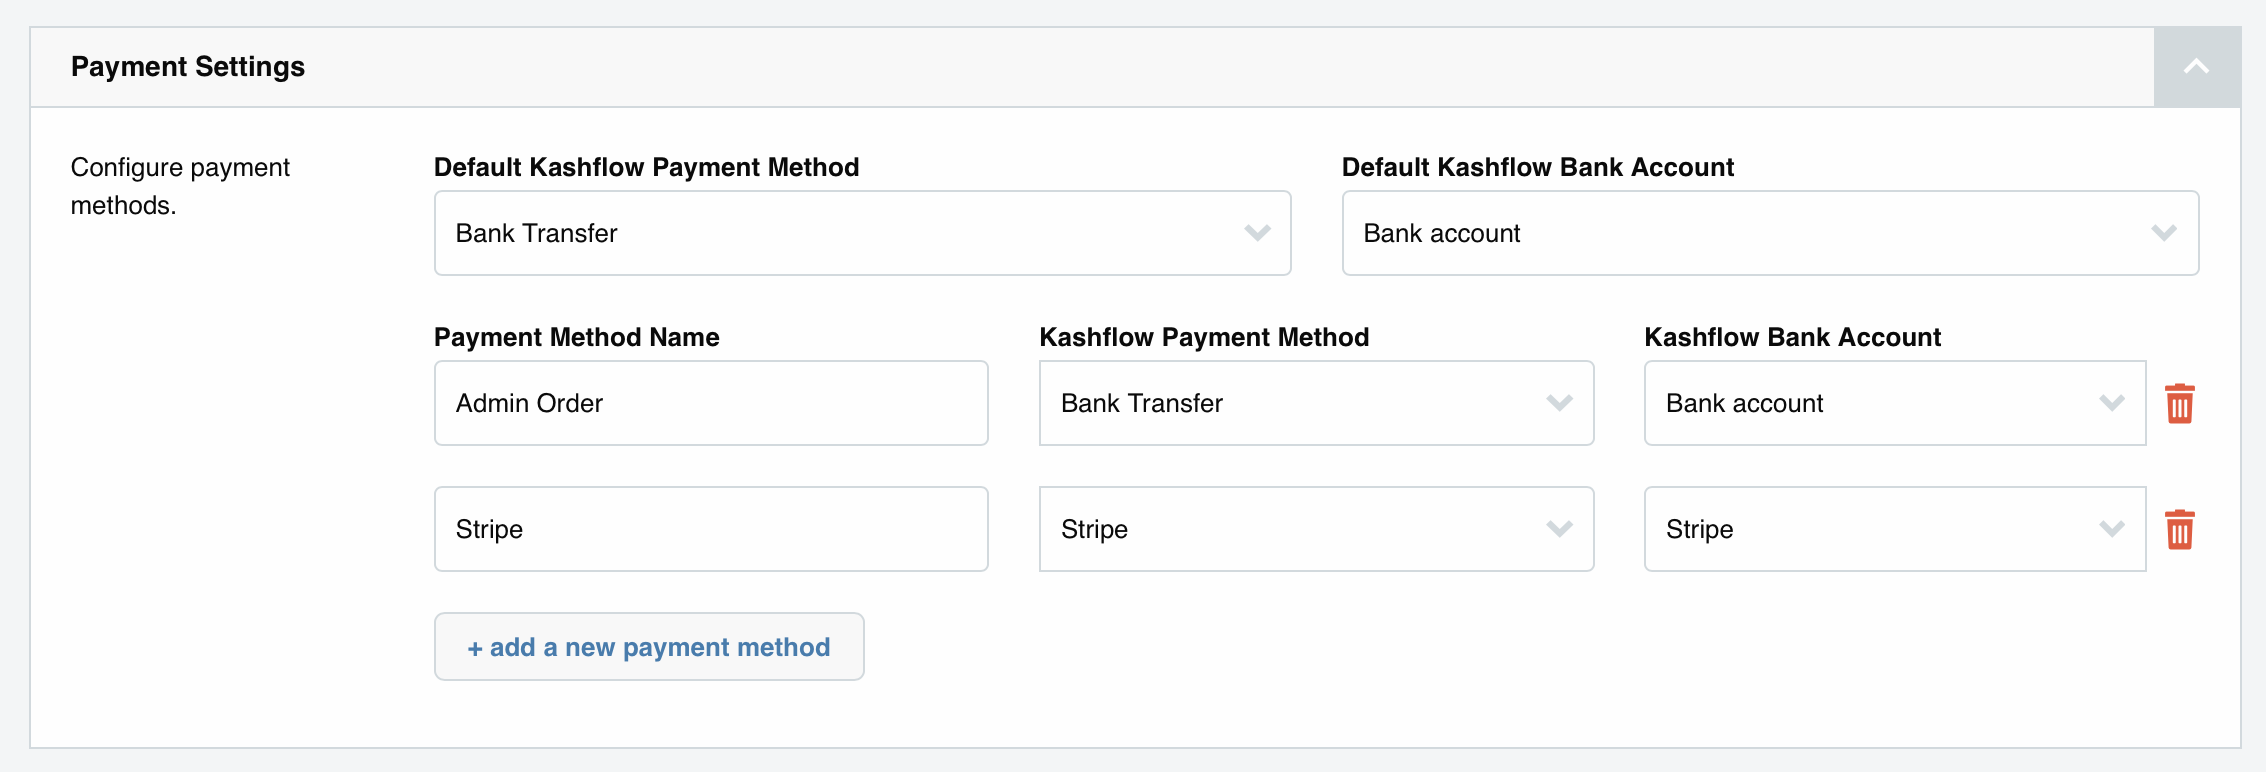
From the Default Kashflow Bank Account list you can select the account on Kashflow that we should allocate the payment to.
From the Default Kashflow Payment Method list you can select the payment method on Kashflow that we should allocate the payment to.
Then, you can also specify different Kashflow bank accounts and Kashflow payment methods for each different payment method that your customers can pay you through on your ShopWired store, e.g. PayPal, Stripe. Where a Kashflow payment method hasn't been specifically configured, the default payment method (described above) will be used.
In the Payment Method Name field select the name of the payment method, e.g. Stripe, and then from the drop down list(s) select the corresponding Kashflow Payment Method and Kashflow Bank Account that the payment should be allocated to.

You can add as many payment methods as you like.
Exporting orders
Exporter Settings
To enable the Kashflow app to begin exporting orders from ShopWired tick the box beside 'Yes' under 'Enable The Exporter' in the 'Exporter Settings' section:

Then select save changes.
Export on Demand
Use the ‘Export on Demand’ section to manually export a set of or all of your orders:

Enter the order reference numbers in the ‘From reference’ and ‘To reference’ boxes to determine which orders you want to export. Or leave the ‘From’ box blank to export orders from the first order and leave the ‘To’ box blank to export orders until the last order.
Use the tick boxes under ‘Skip already exported’ and ‘Skip errored’ to determine if you want to skip orders which have already been exported and orders which resulted in an error when they were last attempted to be exported.
Then select export orders to export your chosen orders.
Export errors
Occasionally the app may encounter an error when trying to export an order from ShopWired to Kashflow. When this happens the details of which order failed to export and the reason for it will be displayed in the 'Export Errors' table:

For each order that fails to export, the error returned by the Kashflow system will be displayed. This may allow you to fix the error on the ShopWired order, by editing the order, and then you can click to retry exporting the order.
If you're unable to fix the error please contact us.
Use the ‘Error Notification Email Settings’ section to determine whether or not you should receive an email when an order has an export error. Once you tick the box to enable the emails you will be able to enter the email address where you want to receive these emails:

Once you have entered an email address select save changes.
