Managing your orders
To manage all orders that have been placed (either manually or on the website) and orders which are 'incomplete' or 'pending', select from the menu.
• Filter views
• Searching and filtering orders
• Archiving orders
• Trade orders
• Viewing an order
• Order management
• Refunds
• Order comments
• Print/download
• Order timeline
Filter views
When the 'Your Orders' page loads, by default all complete and unarchived orders will show, but you can search and filter your orders in a number of different ways. Using the filters at the top of the screen, you can move between different filter views:

There are a number of preset filter values which will show you the following types of orders when selected:
- All Complete Orders
- Shipped orders
- Pre-Orders
- Awaiting Payment orders
- Incomplete Orders
- Pending Orders
These six filter views cannot be deleted, but you can change the names of them through the 'Order Settings' page. Please note that even if you change the name of them, the type of orders which are displayed by these filter views will stay the same.
You can add filter views by using the below search and filter options and then selecting Save Filter View:

A box will appear allowing you to enter a title for the filter view:

Once you have added the filter view, it will appear under 'Custom Filters' in the top row:

All of your custom filters will display here. You can rename and reorder them on the 'Order Settings' page.
Please note!
Renaming a filter view does not change what type of orders are displayed. If you want different orders to display, you will need to save them under a different custom filter view.
Searching and filtering orders
Use the drop-down menu towards the top right of the page to display either 'All', 'Archived', 'Unarchived' or orders with a 'Preorder' status:

To search your orders by customer name, email, postcode or reference, type your search term into the ‘Search Your Orders’ box:

To filter your orders by what product has been ordered enter the SKU number, product name or the brand into the ‘Filter Your Orders’ box:

To filter your orders by the date they were created, select the Filter By Date option in the top right corner. In the date boxes that open, enter the beginning and ending parameters for the filter and then select Apply:

If you are looking to filter your orders by:
• billing country
• delivery country
• payment method
• order status
• a range of delivery dates
or
• custom fields that you have created for orders,
select the More Filters button and these options will be made available to you:

Please note!
Custom fields created using the ‘Product List’ or ‘Value List’ types will not be eligible to use as filters.
In the pop-up window you can also select a number of different filters at once, as shown in this example:

Archiving orders
To archive or unarchive an order select or deselect the tick box underneath 'Archive' on the order:

Trade orders
If an order appears with a green (T) next to the name, this means the order has come from a trade account, as in this example:

To take orders from trade accounts, you will need to have installed the B2B app.
Viewing an order
To view a specific order click either on the ID number, the date, the customer name or the View button. This will display a page with all of the information about the customer and their order.
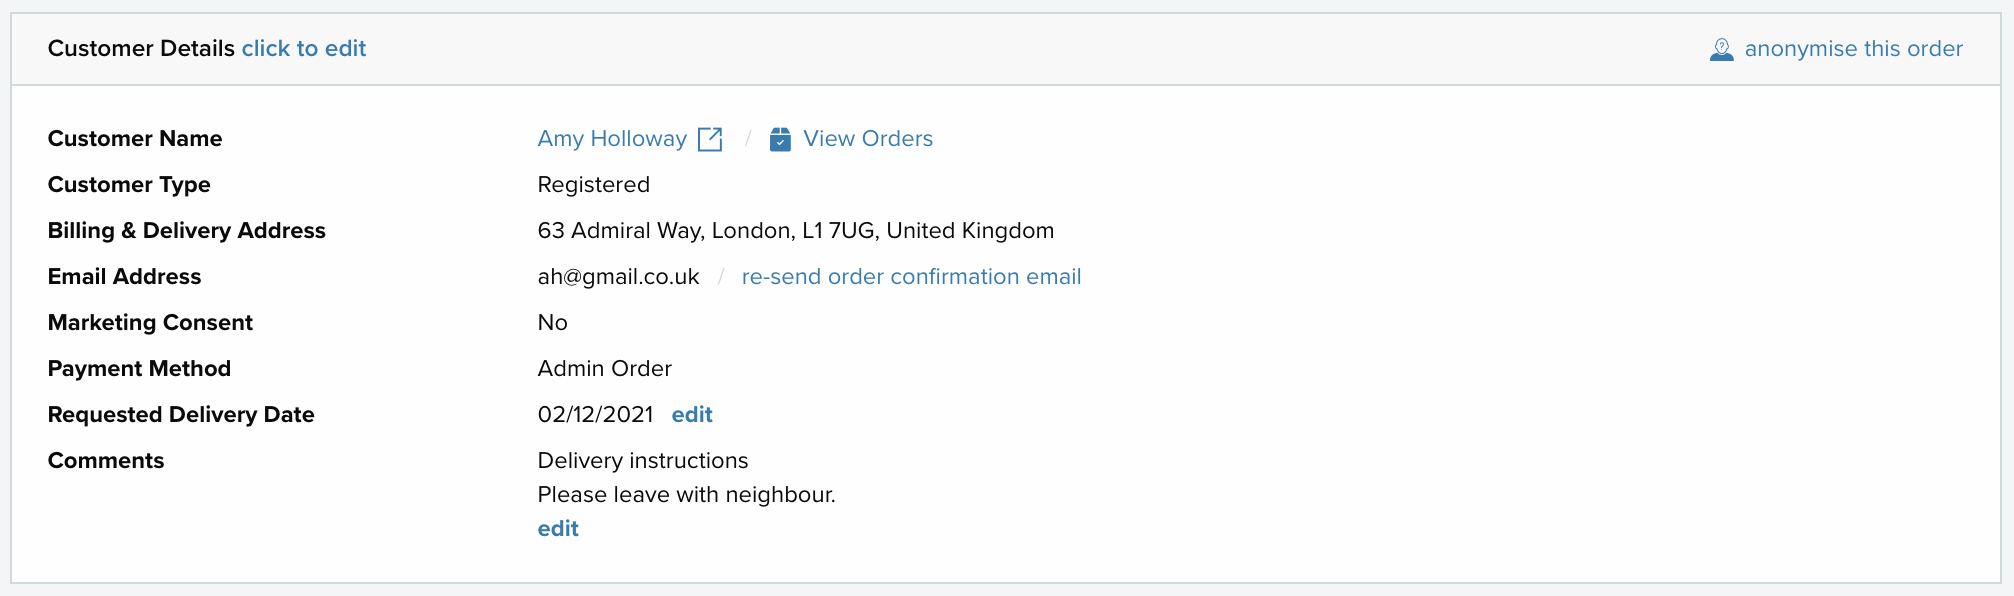
Customer details
The first section allows you to edit their details, re-send their order confirmation or anonymise their order:
If you do choose to make all of the data for any order anonymous, it is an irreversible process.
Clicking on the customer’s name opens a new window with a customer record. Selecting View Orders opens a new window showing you the orders they have placed.
If you need to add/alter the delivery date for the order, select edit on the 'Requested Delivery Date' line. A date selector will then appear for you to select a date:

To edit a customer's comments for their order select edit beside the comments.
Products ordered
The next section, ‘Products Ordered,’ shows you all of the information about their order, including what products they’ve ordered, if they had any discount and what their chosen delivery method is:

Order management
In the 'Order Management' section you can:
• Make the order 'Active' or 'Archived'
• Change the status of the order
• Select whether or not to send an email to the customer about a change to the order status
• Apply a tracking URL to the order for the customer to be able to use

Remember to save any changes you make.
View and customise order status email for individual orders
You can change the default content of all of the emails that are sent about an updated order status by editing your order status emails in settings. Additionally, you can preview and edit the content for an order status change for a specific order when editing the order. This way you can cater the email to the specific customer that the order is for.
To allow for previewing and editing of order status emails from within individual orders you will need to enable the setting on the 'Order Settings' page. To do this, select from the menu.
In the 'Order Emails' section, place a tick in the box next to 'Yes' under 'Customise order status emails before they are sent to the customer'. Then select save changes.
Once you have enabled the setting, when you are managing a specific order and you select to change the order status and also to send an auto-email to the customer about the change, the content of the email will appear for you to be able to preview and edit:

If you have enabled HTML emails, you will also see a content box to edit the HTML version.
Please note!
If you have enabled HTML emails, you should make any edits to the order status email content box which displays the HTML content. Changes made in the 'plain text' section won't appear in the email which is sent to the customer.
Additionally, when you have enabled to customise order status emails from within the order management page, you will be able to view the content of what was said in sent order status email updates by selecting to view the email in the 'Order Comments' section:

Refunds
If you need to add a refund for an order, you can do so in the 'Refunds' section.
If you are using the PayPal or Braintree payment gateways, then refunding an order here will also refund the payment to the customer's card.
For all other payment gateways, adding the refund in this section will not process the refund for you; you would need to do that through your payment gateway account.
Enter the refund amount and a comment (for internal use) about why you are issuing the refund and then select add refund:

Order comments
Use the 'Order Comments' section to add comments about the order for your internal use. Write the comments you need to make in the ‘Add A New Comment’ box and select add comment.
In this section you can also see any order status updates that you have made for the order:

Print/download
If you want to print or download a specific order, use the Print and Download buttons in the top right of the screen for the order:

The Print button will open a PDF document for you to print. Click here to learn how to customise the contents of the PDF.
The Download button will download a CSV file to your computer's hard drive. The format and layout of the file cannot be changed prior to download.
Order timeline
At the bottom of each order you can see a timeline of events for the order:

This includes events such as order status changes and what emails are sent to your customers.
You can use the timeline to resend emails to the customer and to see the contents of previously sent emails.
When an order comment is added to the order, the timeline will display which user left the comment.